Stars News


Which cream is best to use to flatten the cake. Cake straightening cream How to top the cake
MK assembly of a cake in a "well"
I will write how I do it, and you decide whether to do so or not.
I have such plastic coasters-thermo napkins on the table, for food. Dense, 1.5-2 mm thick.
They are often sold in hardware stores, they are multi-colored. The size is about 40x26 cm.


In short, I cut it lengthwise and put it in a split form. Because it's really more convenient with them. If there is no detachable form, then I simply fold it into a ring along the diameter of the bottom cake and fix it with tape, put it on a substrate or a cutting board. And in this "well" I do the assembly.

I make a dense cream "butter + biscuits", choose the proportion for yourself, the more biscuits, the denser the cream, here about 2: 1 butter: biscuits. I pass the cookies through a meat grinder, it turns out a very small crumb - just flour.

Now let's prepare the bottom. Today, in my case, this is the bottom of the split form. Just a food pad of the required size (for some reason))) was not in my house. But there are no obstacles that we cannot overcome. We set ourselves and successfully overcome).)))


I put butter-baked cream in a pastry bag (I will write MP cream), so as not to stain the nozzle, I just cut off the tip.


I put in the first cake - I chose the smoothest one. You will understand later why.

Now I am making such a side along the edge - on some sites and in some recipes this technique is for some reason called "tortizing". In fact, "tortizing" is just spreading the cakes with cream.

I coat the cake with banana cream and lemon Kurd, candied fruits, chocolate chips, and more sour cream.


I cover with the next cake and again make a side along the edge of the cake.


And if the cakes are slightly less than the diameter of your "well" made of plastic supports, then the walrus is even better. Then a layer of this cream can be spread along the edge of the cake, i.e. you get such a "coat" from MPcream.


And so all the cakes. I align it from above - I put a substrate and a small weight on top. In the refrigerator for impregnation and cooling. According to my observations, cookies take away excess moisture and swell a little. And when cooled, this cream turns into a "shell", which is very good for mastic.
Here's what happened. The resulting gaps at the cakes, holes and shells are carefully covered with MP cream.


Now I cover the cake with a suitable substrate, quickly and carefully turn the cake upside down, ie. now the even first cake turns out to be the top.

This "carapace", when it cools well, will reliably separate delicate cream from any external coating - cream, glaze, mastic, etc. When it stands in the refrigerator for 4-5 hours, or better at night, then where else it is necessary to trim with MP cream.

I think that this way of assembly is much more convenient, and then easier to align.
Chill some more. And then decorate as you need.
Here you can see that the first cake when assembling is at the top - it is light, and the last, dark - at the bottom.

I ask you to excuse me in advance that the photo is without a background, the scene of today's show "the kitchen as it is".
In the previous MK on assembling a cake into a "well" - it was about a round cake. There was a question from a sweet girl Vera. How to assemble a square or rectangular cake using this technique? And in this MK we will talk about assembling a cake in a "box". The tricky part is finding a comfortable "formwork". For this purpose, I adapted the foam trims, which are formed after I cut out the cake holders.
I buy this one in the construction market. It does not come into contact with food, I cover it with a wrap or film.

So, I select the trims of a convenient size. I cut it to what is necessary and wrap it with cling film.


Then you need to prepare a substrate for the cake. If there is no proprietary gold-silver laminated backing, no problem. You can just take a cardboard box from a candy box, from a box for oatmeal or other cereals. In general, a cardboard box and wrap with cling film is quite suitable.

The backing is the bottom of the box. It does not connect to the sidewalls in any way. I make a box without a bottom and a lid.

I fasten it with toothpicks. It is not difficult to do this, the main thing is to measure everything exactly and make the required size - it is possible more by a couple of millimeters, but not less than our cakes.


Let's start assembling. It is necessary to prepare in advance an oil-baked cream (MP cream) butter: cookies in a 2: 1 ratio. It is most convenient for me to "put" the sides out of the pastry bag, it turns out neatly, everywhere exactly. We put the first cake. And we do the same as with a round cake - we coat the side around the perimeter of the cake. We spread what we want to fill the cake with - berries and cream, the next cake, and so on. Today I have cherries and sour cream (eh! ... I discovered that there is no photo with the cream))))


In the course of work, I check that the "formwork does not" disperse "- I check the right angle with a triangle, if necessary, put more toothpicks and carefully maintain the accuracy of the shape.


I coat all the cakes. In my case, there are still a couple of cakes left. When I reached the top, I covered it with a substrate and put a small load. Once again I checked the accuracy of the shape - right angles and did not part where the joint was - and in the refrigerator for 6 hours for impregnation and cooling.


Here's what happened when I took it out of the refrigerator.

Once again, I covered all the cracks and shells with MP cream, smoothed and missed more thoroughly. Here's the bottom line.

___//\\___//\\___//\\___//\\___//\\___//\\___//\\___//\\___//\\___//\\___//\\___//\\___//\\___
MK from iuliana78
"Aligning the cake for mastic using a triangle"
As promised by MK for aligning the cake with mastic.
For the quality of the photos, I apologize, I often had to take a picture with one hand, the camera was heavy, I took a lot of photos, but only half came out, it was hard for my hand to hold the weight and trembled, so this is a bad result.
This is how the cakes look before assembly:
Here I collect the cake and make sure that each cake lies flat:
We leave the collected cake to soak:
Before applying butter cream remove the remnants of sour cream:
Cover the cake with a foil and put the load, check if the plate is lying flat without gaps, you can continue to work, if not, then leave it for a while, I do not advise you to press it yourself, you can ruin the cake very quickly, it just happened so. a couple of plates on top, make sure that the plates are strictly in the center, otherwise you will not see an even cake. This part is very important because it depends on how quickly we level the cake and how much cream it will take. And selling cakes by kg, we cannot afford a ton of butter cream, otherwise the loss of customers is guaranteed, no one wants to pay for excess weight:
Put butter cream on a very chilled cake. The butter cream should be very, very soft. Apply the cream to the sides, then to the upper edges, and only then to the middle:
This is where my husband's invention begins. Take a triangular ruler and work miracles. The ruler should lie flat on the plate, we keep an eye on this constantly:
The ruler shows where we have a lot of cream, rotate the cake, periodically remove excess cream from it. This is how the cake looks after two or three rotations with the ruler:
We check where the cream is missing and add:


We go to the upper part, take a long ruler, begin to align the smallest part so as not to spoil the sides and send the cake to the refrigerator for an hour. With a chilled cake, we will be able to press more on the ruler without fear that the sides will drop:
We take out our cake and begin to further align, where there is not enough cream, add:
Again, we look evenly or not, also do not forget to spin the cake a couple of times to check the sides with the help of a triangle, the top and again the sides, so a couple of times:
From the photo you can see well, where the cream is different in color, I added this layer of cream after, where there were gaps between the cake and the ruler. And now our cake is ready for mastic:
___//\\___//\\___//\\___//\\___//\\___//\\___//\\___//\\___//\\___//\\___//\\___//\\___//\\___
This is a method of aligning between two surfaces. Type with a coup, but no coup
Original article here
This requires two identical substrates. The cake is assembled on one, the second is put on the top of the cake, after having generously greased the top with ganache. The top and bottom cartons must match exactly. It is convenient to combine them with two scrapers or triangles. I did not photograph this moment during assembly, so this photo shows a baking dish instead of a cake.
The distance between the edge of the cake and the substrate is ideally 5-6mm. After the edges are aligned, this space is filled with ganache (or cream), the excess is scraped off, as always. The scraper rests on both edges at the same time, and you can immediately see where it is missing. A swivel table is a must here.
I had a regular cardboard backing, and to make sure I could remove it from the top of the cake without any problems, I wrapped it in wax paper.
After the ganache has solidified, remove the lid
Here you can see that the surface is not perfect and needs some work. This is how it turned out for me, apparently the ganache was not quite evenly distributed, bubbles formed (((But it was not difficult to fix it. Then, with a hot dry scraper, walk along the sides and top, remove small irregularities.
According to my observations, the consumption of ganache is higher.
Here are a few more photos of how easy it is to make an even and clean cut of mastic around the edge of the cake.
Trim off excess directly under the substrate.
Align the cake with corners
Cut the already assembled cake on a substrate so that there is at least 3-5 mm from the edge of the substrate to the cake. Combine the upper and lower substrates with scrapers (or triangles, as it is more convenient for you).
At the same time, you can check the surface with a level
Here in this photo you can see that the corner is completely empty.
All this space will be filled with ganache, it is quite heavy and adds a lot of weight to the cake.
After making sure that no side of the cake sticks out anywhere and the surface is even, remove the top substrate from the cake, generously grease the top of the cake with ganache, put the substrate on it and reconnect the edges. This important point since the corners must be strictly one above the other, otherwise it will not turn out exactly.
After that, you can put the cake in the cold store for a short time, so that the ganache grabs a little and the substrate does not move.
Then align the sides as usual. We leave the corners for last.
It will look something like this.
Now the corners. Build the corner with ganache
Now place both scrapers exactly at an angle to each other,
and at the same time carry out with two scrapers from the corner to the sides, tightly pressing the scrapers to both substrates
At this stage, it is better to remove the cake from the rotating table.
It will look something like this
Align from corner to side several times until you are happy with the result.
Today I will show you how to decorate a cake for a holiday at home, leveling it with cream. This requires knowledge and manual dexterity. Mastic cakes have long faded into the background, and "naked" cakes or cakes covered with cream and decorated with fruits and chocolate are in fashion. You can use any cream for decoration: protein meringue, cream cheese or, like me, vegetable cream. Vegetable creams are great for garnishing, they don't flow and they whip great. I do not recommend using regular cream, as it will flow and you will not be able to align the cake perfectly with it.
Ingredients
To align, we need:
cake;
vegetable cream;
pastry bag with a nozzle;
leveling spatula.
Cooking steps
Let's make the cake the night before decorating so that it will sit down and soak.
Beat the cream for decoration. The cream can be any, I use vegetable confectionery cream, they do not flow and keep their shape perfectly. Beat the cream as indicated on the package.
 Fill the pastry bag with cream.
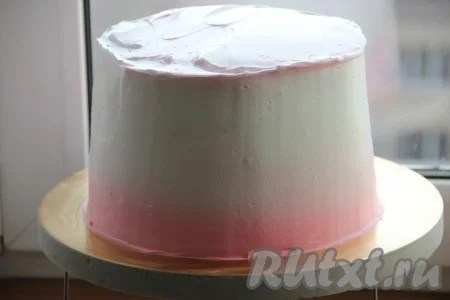
 Now let's align the cake. Starting from the very bottom, squeeze out the cream in a circle. If you want to make a color transition on the cake, you need to touch up the cream food coloring in the desired color.
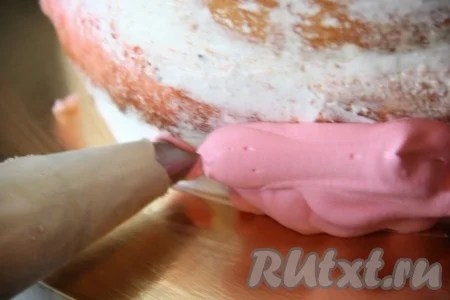
Gradually cover the whole cake with thick layers of cream, about 1-2 centimeters thick.
 Align the sides of the cake with a special spatula. We hold the spatula in place, twist the stand with the cake as much as possible until the sides of the cream are even.
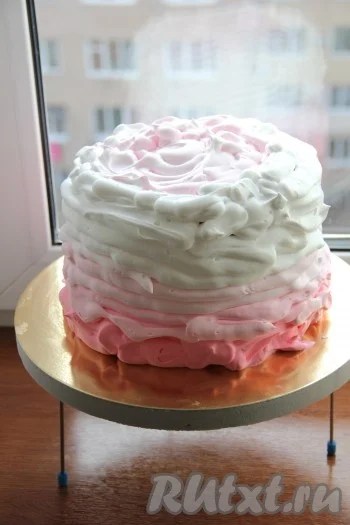
 These are the smooth sides we should get.
 Next, decorate the cake as you wish: with fruits, sweets or chocolate drips. Thanks to the leveling of the cream, the cake turns out to be amazingly beautiful.
 Bon Appetit!
Today I will share with you the technique of decorating cakes with cream and icing with decorative elements made of mastic.
Step 1 – folded the cake(inside it can be anything), left to stand for the night. During the night, the cake is well saturated, the cream hardens and then it will be possible to work with it further.
Step 2- if your cake turned out to be uneven, then it must be additionally leveled with either ganache, or butter-thickened cream, or a crumb of biscuit with butter-thickened cream. Or you may not need to level, BUT then you will need more mascarpone cream to finish the cake.
Step 3 –
Let's make a cream with mascarpone cheese.
The recipe is quite simple:
- 300 g - mascarpone
- 80 - 100 g - softened butter
- icing sugar to taste
Beat everything well to make a thick cream.
Step 4 – We paint the cream with food dyes in the colors we need... I would like to draw your attention to the fact that harmoniously selected colors will add a special chic and style to your cake.

Here is the most understandable color scheme for color combinations.

Step 5 – Apply the cream to the cake using a pastry bag(if you don't have bags, you can use a milk bag) I love using disposable piping bags. If bubbles appear in your cream, then you need to refrigerate it a little, because it has a very delicate structure and can lose its properties when overheated.

Step 6 – align the cream with a pastry spatula(either a knife with an even edge, or you can buy a metal ruler - it is very convenient to work with it, it replaces a pastry spatula).

Step 7 – cool the cake well, you can even put it in the freezer for 10-15 minutes, so the top layer of the cake will harden well and the icing will lay down beautifully on top.
Step 8 –prepare the icing and cover the cake.
Glaze with chocolate
For 100 g of chocolate, about 40 g of butter.
Melt the chocolate (in the microwave the easiest way) and add butter there, the consistency of the icing will be silky, very tasty and will not crumble when cutting the cake (like ordinary chocolate). Working temperature 30-32 degrees (or you can try with the back of your hand - the glaze should not be hot).
How to cover and glaze the cake ..We made a cake. How to cover it, glaze it? Ganache is tasty, beautiful and convenient.
Here are some recipes: Ganache cream 1 cup (the fattest) 50g butter sl = 4 tbsp 200g chocolate Warm, luminous ganache is good as icing, pour cakes and muffins. Alternatively, you can chill the ganache and, in this case, use it as a spread. (cream). To do this, whip the cooled mixture of cream, butter and choco with a mixer (it brightens and becomes thicker) ... just before applying to the top and sides.
How to cook: Chop the choco, boil in micro (fatty) cream (there will be no problems with whipping), and add butter here in pieces, which gradually melts. Mix well, cool. Remove from the cold and beat until fluffy. The ganache gradually thickens and turns into a cream. It takes a long time to whip, not right away! If you do not need so much .. you can cut the recipe in half .. reduce.

1. Ganache - 360 g of chocolate (dark) - 360 g of cream - 1 tbsp. butter Put everything in a bowl and put on water bath... Stir gently until completely dissolved (do not whisk!)
2. Dark chocolate ganache - 300 ml heavy cream- 450 g of chocolate - 90 g of butter Put food in a bowl on a water bath and stir everything until completely dissolved (do not beat!)
3. Ganache from white chocolate- 150 gr cream - 200 gr white chocolate - 2 tsp Instant coffee Heat the cream (do not boil). We put coffee in the cream. Put chocolate in this mixture and stir well. When it cools a little, beat with a mixer. You can glaze with this ganache, and coat the cakes with whipped.

Limo glaze
200 gr icing sugar, 2 tbsp. lemon juice, 2 tablespoons hot water Powdered sugar is ground and sifted through a sieve into a bowl, add lemon juice and hot water and rub with a wooden spoon, until the glaze turns into a homogeneous shiny mass.
Glaze: 250 cream 125 sugar 2 tbsp / l cocoa - mix everything put on the fire and simmer for 15 minutes, pour over the whole cake - very tasty!
Boil the icing in a water bath 150 g of chocolate 50 ml of milk - pour over the cake, decorate as desired!
Glaze: Melt 100g of chocolate 25 ml of milk in a water bath

Glaze Silk 4 tablespoons of sugar 2 tablespoons cocoa spoons 4 tbsp. tablespoons of milk 50g butter Mix all the ingredients of the glaze, put on a small fire and cook until the mass thickens. Add 50g butter, glaze 5-6 tbsp / l sifted icing sugar 3-4 tbsp / l cocoa cream powder and cocoa mix well and add a little cream To get a beautiful glaze, coat the top cake. Simply easy and delicious

Chocolate icing: 4 tablespoons milk 4 tablespoons sugar bar of chocolate (any, white or dark) 75 ml. cream 50 g butter chocolate glaze Cook milk with sugar until it becomes a little thicker than water, add chocolate, butter and cream. We wait a little more as it melts, literally half a minute or a minute and turn it off. If you need to water the cake, then cool it a little, otherwise the cream will flow. Fill with glaze, and sprinkle-decorate with whatever you want

Glaze. Whisk 2 whites with 1 tbsp. powdered sugar and 2-3 drops of lemon juice. dip ready-made gingerbread in this glaze. I make chocolate glaze (or maybe sauce) like this: 100 g of dark chocolate, a little cream and 30 g of butter. Melt everything over low heat, let it cool slightly and pour over the pie
Glaze: heat the sour cream and add the broken chocolate. Stir until the chocolate is completely melted. Grease the cake and refrigerate.

Glaze: 1 cup icing sugar, 2 tbsp. l. lemon juice. Bring the icing sugar to a boil with 50 ml of water, add lemon juice and cover the rhombuses with it, decorate with sprinkling.
Protein glaze. Beat 5 egg whites until peaks, add 1-1.5 cups of sugar.
Chocolate glaze: 100 g plums. butter chocolate bar (not less than 70% cocoa) 450 g sugar. powder 1/2 tsp vanilla (forgot about it) 5-6 l hot concentrated milk. (took regular milk). 450 g sugar a lot of powder! I first poured a little milk into the eye, then crumbled chocolate into pieces and put butter, gently whipped it all with a whisk, then began to add a little sugar powder. I had 310g.
this protein cream

serves not for a layer, but for covering cakes.
In fact, this is a royal icing that does not harden, but remains soft. Mild Royal Icing (by Nigella Lawson) 2 egg whites from large eggs 500 g icing sugar 1 teaspoon lemon juice 1 teaspoon glycerin Beat the whites and slowly add 100 grams of powder, then gradually add the rest of the powder, lemon juice and glycerin. Continue whisking until desired consistency. This amount is enough to cover 24 (cupcakes)
Creamy frosting 1 cup sugar 1 cup 30% cream 1 teaspoon butter vanilla sugar Place the cream and sugar in a small saucepan and cook, stirring occasionally, for 10-15 minutes, until the mixture thickens. Add softened butter, season with vanilla sugar, grind until smooth and use immediately.

ROYAL GLAZE Or icing
This glaze forms a hard, brittle, glossy surface. The recipe is designed for a one-time serving of frosting, which should be enough for one curly Christmas cake. It is necessary to prepare and sift well about 250-300 grams of fine powdered sugar in advance. 1. Carefully separate the white of a fresh large egg into a clean, wiped container, preferably a glass one.
I remind you that you should carefully perform this action and do not allow the yolk to get into the protein. Even a very small amount of yolk will greatly reduce the astringency of the protein. chicken eggs... If you find "albumin", then it is enough to take only 3-5 grams of it in powder. 2. First stir the protein, then whip it up with a quick movement of your hand, but not very hard. The easiest way to do this is with a special wire whisk. Many housewives skillfully perform this operation with a fork. 3. Gradually add the sifted icing sugar, about 1 tablespoon at a time.

You can interrupt whipping, add a spoonful of powder, then start whipping-stirring again until the maximum solution is reached, but this must be done with a wooden spoon.
4. And so it is necessary to do until the complete consumption of the prepared powder. This can be greatly assisted by using an electric multi-speed mixer. The result should be a homogeneous, white, shiny mass.
5. In the middle of the batch, add a couple of drops of citric acid, and add one teaspoon of refined vegetable oil to give a better gloss to the glaze.
6. At the end of the batch, adjust the consistency of the glaze by adding a little water or icing sugar, depending on how you intend to use the glaze (it should be harder to cover surfaces, especially corners, and more flexible in order to make inscriptions or draw patterns with it through a cornet).

7. After the glaze has been prepared, it must be preserved before use. Wrap the glaze jar with a damp cloth and place in an airtight container. Various plastic containers with sealed lids can be found on the market. A damp cloth will create a strong, absolute humidity inside the container, which will prevent the glaze from drying out. If containers are not available, you can wrap the container tightly over the damp cloth with plastic wrap. In the refrigerator at +5 degrees, the glaze in such a package can be stored for up to 5-7 days.
8. Stir the glaze thoroughly before use and check for plasticity. It may be necessary to adjust the consistency in accordance with point 6.
In any dessert, the main thing is taste, but the type of sweetness is also of great importance, especially if the treat is intended decorate the holiday... In this master class I will show one of the methods, how you can even out the cake with cream.
Very soon I will also prepare a continuation of this master class and show you how to cover the cake with mastic.
How to smooth a cake with cream - step by step
So, I have a biscuit, a syrup to soak it, and a cream. I baked the sponge cake in a shape slightly larger than our cake should be. We cut it with a serrated knife into cakes of the required thickness. Now we take a plate or lid of the same diameter as we want to make the cake. Turn it over on a cake and cut out a circle. We do this with all the cakes.

With the resulting circle, we spread the side along the edge of the cake.

Saturate the resulting "bowl" with syrup, spread out some of the cream.

We put the next cake on top, again form the side, syrup, cream. And so with all the cakes, except for the last one. You can leave the side of it for tea) You will get such a flat cake.

Smooth, but not quite. I'm going to cover the cake with mastic, so I need to get the surface as flat as possible.
I use a protein-oil leveling cream. You can use whatever is convenient for you (butter + condensed milk, ganache, etc.).
Something I did not make friends with special scrapers for alignment, the usual triangle ruler is somehow more convenient. So, put the cake on the turntable (if you have one), put the cream on the top of the cake, level it with a scraper. Now, place the scraper at an angle to the surface (about 45 degrees), and rotate the table, hold the scraper motionless.

Now let's move on to the side surface. We also apply the cream, put the scraper at an angle relative to the surface of the cake, but try to keep it perpendicular to the table. We rotate the turntable. This will smooth out rough irregularities.

A small "crown" is formed along the upper edge. Don't touch her. While the cream is soft, it will be difficult to remove it neatly. We put the cake in the refrigerator for 15 minutes.

We repeat the alignment. Again, first the top, then the sides. And again in the cold. Now for 30 minutes. If two approaches were not enough for you, you can repeat the procedure. And sometimes, one approach is enough for perfectly even alignment.