Star News


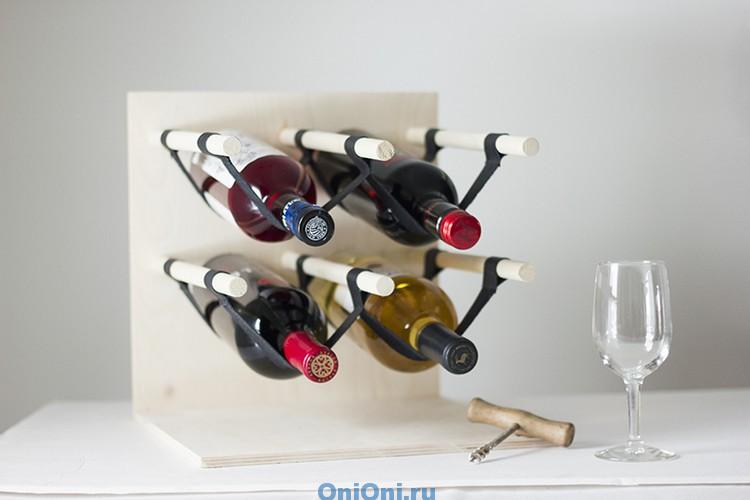
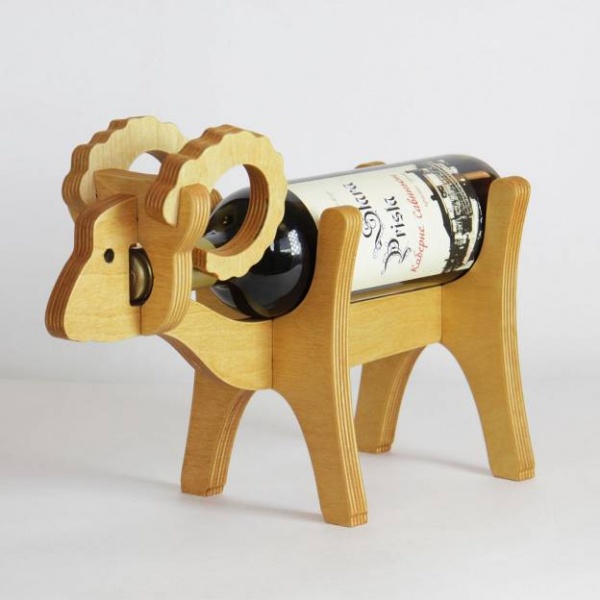
DIY bottle holder made of wood. Homemade wine shelves and bottle holders for the kitchen. Shelf made of wood and metal plates
If you are a healer of European cuisine, then you must love to be pampered with a glass of expensive wine during your meal. This drink has gained popularity and is not losing its leading position. Such a noble product requires a special approach to storage. True connoisseurs collect collections from rare and valuable items. If you also decide to acquire one, then you should familiarize yourself with how a do-it-yourself wine shelf is made. A description of the stages of work will be presented below. You can easily make structures for such a purpose yourself.
If the kitchen space is limited and has little free space, you can get a vertical floor-to-ceiling shelf. To carry out the work, it will be necessary to make only a few holes in the plywood sheets and fasten them together. This design can be used as a partition to divide the space. If you paint the inner surface of the product, then the shelf will become a fashionable and stylish interior detail. But you can buy a shelf in the store, however, some home craftsmen prefer to make such designs on their own. Among other things, when carrying out work, you can use the materials and tools at hand. Thus, the construction will cost almost free.
Instrument preparation
If you need a wine rack, prepare the following tools:
- electric jigsaw;
- grinder;
- pencil;
- roulette;
- building level;
- screwdriver;
- drill;
- circular or hand saw.
Preparation of materials
At the hardware store, you can buy dowels, cork drills, self-tapping screws, a wooden pallet, and sandpaper. The latter will be needed for surface treatment.
Work technology

If you are going to make a shelf for wine, then an old pallet can lie at its base. To do this, using a circular saw, it is necessary to saw it, separate part of the structure to make a shelf. Its height should be approximately 50 cm. The next step is to prepare the boards for the base. With the help of a nail puller and a hammer, it is necessary to tear off two boards, while the main thing is not to break them. Three small blocks should be prepared in order to perform the separation and fixation of the bottom. The bars are cut with an electric or manual jigsaw, and the length of these blanks should be slightly larger than the width of the pallet boards. They should extend slightly beyond the base.
Grinding and working with holes

The wine shelf should look attractive, so the beams and boards need to be sanded. This will save the product from burrs and irregularities. In this case, you should use sandpaper, the grain size of which can vary from 120 to 200. You can also use grinding machines. On one of the boards, holes should be made for glasses. Trays are typically 100 cm wide. The holes should be standard, but you can make them to fit exactly the size of your glasses. With standard tableware sizes, one hole should be marked, leaving 11.5 cm from the edge of the board.After that, three more holes should be marked, stepping back 10 cm.From the edge of the board, there should be a distance between 4 and 4.5 cm in width. Similar marks should be made on the other side.
The wine shelf should have holes that are made with a drill or drilling machine. From the edge of the drilled holes to the edge of the board, you should carry out the marking, cutting off the unnecessary. The resulting corners are processed with sandpaper.
Assembling

Wine shelves can be made of different materials, but wood will be the cheapest. If you used pallets, then after carrying out all the steps described above, you need to assemble the bottom of the shelf. Glasses will be located along the length. Parts of the bottom must be fixed with self-tapping screws, holes must be made in these places with a drill. After the bottom can be collected, it should be strengthened to the base. At the same stage, everything must be fixed with self-tapping screws, having previously made holes for them. In this case, the possibility of splitting the board should be excluded, otherwise you will have to look for a replacement for it.
After assembly, the product should be cleaned with sandpaper and stained. Once the wine shelves are made, they can be hung on the wall. To do this, use which points are marked on the wall. According to the marks obtained, holes should be made with a drill, and then dowels should be inserted into them. Self-tapping screws with a length of 2.5 cm are screwed into the latter. The hats should not twist tightly, because the shelf will be removable.
Alternative shelf options
DIY wine shelves can be made using simpler technologies. For example, a wine cabinet can be made from a wooden box. It is installed on steel legs, and holes for bottles should be made in the bottom. There is a shelf between the rows, which will divide the bottles among themselves. The simplest solution is a wooden board that is fixed horizontally to the wall. It will be possible to make holes in it using a special drill. The main subtlety is that the holes for the necks must be drilled at an angle, while the circles should turn out to be the same. The wooden plank is cleaned, if desired, painted and varnished.
You can start making wine shelves on your own, the simplest options may be to use water pipes, or rather, what is left from the repair of the bathroom. With the help of adapters, pipes are connected to each other in a zigzag structure. To prevent the bottles from rolling over the surface, the pipes should be bent at a certain angle.
Conclusion
You can save space by using the wine bar, which will be located under the table. To do this, you can use reinforcing bars, which are bent in the form of hooks.
Elegant shelves for storing wine bottles will provide you with a lot of free space in the kitchen, as well as give you an aesthetic way to place them! The location of these stands can be numerous - on a table, on a wall, under a chair, or in a kitchen cabinet. Today we want to show you some examples of photos that you can make with your own hands!
We make a small shelf ourselves!

The small wine bottle rack is ideal for those who like to enjoy a glass of wine at dinner or when receiving guests. Or, as an option ... You are a collector of bottles of wine ... Surely, you have a separate place for them somewhere in the basement ... But in your collection there are a couple of the most elegant and beautiful bottles! How can you leave them far away in the basement? After all, you, as a collector, will want to look at such beauty endlessly ... In such cases, make a do-it-yourself wine bottle holder for them! And enjoying this beauty will be at least doubly more pleasant!

Before making such a stand, you must prepare all the necessary materials and tools. First you need two plywood sheets measuring about 26 x 38 centimeters. Secure them with loops. And at a distance of about 30 cm, attach the cord to fix the distance. The tools you will need are a ruler, pencil, cord, hole drill, and 150 grit sanding paper.
Making holes for bottles!

Before cutting the holes - you need to measure them! We make marks and cut them out. In total, we should have 12 circles. Then, sand the edges with sandpaper. Optionally, you can paint the resulting stand.
Installation of hinges

After the work done, you can safely proceed with the installation of the hinges! For greater stability, it is recommended to use at least 2 hinges.
We fasten the rope

The last step is to fasten the lace to securely fix the position of our shelf. Drill small holes, thread the cord, and tie the knots.
Creative pipe and leather shelf

Elegant wine cabinet made of wood and leather
![]()
You can make a wonderful shelf with your own hands from pieces of leather and wood pieces that were once left over. Which will perfectly fit into the interior of the dining room or living room. Wood is an excellent material for creativity. You can use a suitable paint or apply an aging effect. In addition, the wine bottle holder is an incomparable gift that everyone will appreciate!
Creative ideas for storing wine bottles
Plywood and leather strips can be used to create a minimalist wine rack. Treat yourself or the wine lover with a gorgeous DIY gift. This wine rack mounts easily on a wall, table or cabinet. Decorate your interior with this chic shelf!
We make it with our own hands!

For work you will need: plywood sheets, smooth wood nails, wood glue and leather strips. As tools will also require drill and sewing machine.
Shelf made of wood and metal plates

If you do not want to spend too much time and effort on creating a bottle holder, then you should use this very idea! This shelf is made of planks and metal hooks. The most important thing is to find creative hooks.
Installation guide

Wall shelf for bottles

An original idea for a country house

From several wooden planks, you can make a do-it-yourself wine shelf, which is ideal as a decor for a country-style kitchen. You can decorate the finished product to your taste and color.
Practical shelf

Wine racks on the wall will give your kitchen an elegant look. If you are making a shelf with your own hands, then pay special attention to the strength and stability of the bottles so that they cannot fall.
Wine rack made of wooden pallets

Almost all pieces of furniture can be built from wooden pallets! Using a few wooden planks, you can easily build a simple wine bottle holder with shelves for bottles and glasses. This stand can be easily mounted on the wall, which will be an excellent option for small apartments.
A practical idea for wine lovers

Wine shelves with a place for glasses are very practical because they replace your kitchen cabinet and combine the function of wine. 🙂
DIY a simple holder

All you need is colored tape, paper towel rolls and felt. Such a device will be a good addition to the kitchen. After all, the stand can be used for all different bottles.
Wine rack (stand) for horizontal storage of bottles in the interior of the room
Our wine rack or wine bottle storage rack is made of natural and / or heat-treated wood () of various species, such as beech, ash and others. Our wooden wine racks and bottle holders are a novelty in the market of natural wood wine accessories and have no direct analogues in the Russian market.
Wine racks are ideal for the needs of the wine industry, for the interior of a house, apartment or office, for the original design of the retail space of a store, bar or restaurant.
You have not yet come up with what unusual gift to go to visit? Or have you been looking for a solid and original rack or shelf for bottles of wine and alcoholic beverages for your home for a long time? Then you are in the right place!
Wine Bottle Rack from Exclusive Wooden Products
Small cylindrical wooden stand with a hole for the neck of the bottle. The manufacturer offers coasters made of oak, ash and alder. The design is interesting in that it does not need to be fixed to the surface on which it stands. The stand does not fall due to the counterweight of the bottle inserted inside.

Exclusive Wooden Products Wine Rack Makes Physics Think
By adjusting the depth of installation of the neck into the hole for greater stability, even an empty bottle of your favorite collection wine can be installed in the stand. If desired, the stand can be laser engraved with a company logo or any other image. The stand comes with a bag made of dense natural fabric, on which a similar logo can be embroidered. A great gift option!
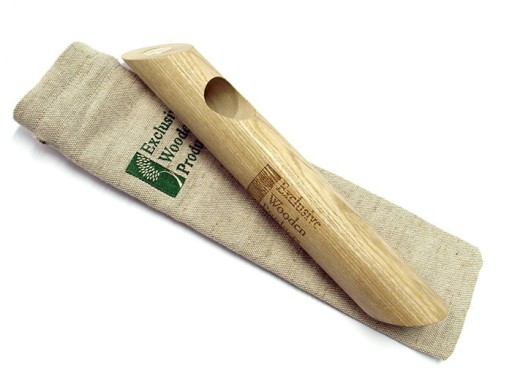
On request, the stand can be laser engraved with a company logo or any other image
Hanging wine rack Cioso Blomus
The Cioso hanging wine rack was developed by the Flöz Design team for the German company Blomus. It is made of stainless steel and is designed for 8 standard bottles. An excellent solution to the wine question for a loft-style kitchen!

Hanging wine rack Cioso Blomus fits perfectly into the interior of a loft-style kitchen
Creative Umbra Wine Racks
A charming creation by designer Dennis Lin - fancy compound wine racks made of circles of different diameters, into which absolutely any wine can be placed without any problems!

The creative Umbra wine rack seems light and unsteady, yet the precious bottles are in a safe place
Designer David Kuan presented an equally curious version of a rack for five bottles in the form of an outlandish flower made of transparent acrylic.

Wine bottle rack in the form of an outlandish flower made of clear acrylic transparent and lightweight
Hanging Wave Wine Rack by Design My World
The idea of creating this graceful wavy wine shelf dawned on the designer as he admired the stream of wine pouring into the glass. Simply brilliant! For greater decorativeness, on one side, you can place bottles with white wine, and on the other - with red. A kind of wine yin-yang ... It is not for nothing that they say that it is true in wine! Although many mistakenly look for it at the bottom of the bottle ...

Design My World's Flow Wine Rack hanging wavy wine rack will brighten your kitchen without taking up a lot of space

Make wine bottles a highlight of your kitchen interior!

Wooden wine rack from Potterybarn successfully harmonizes with the whole environment, combining with it in style

Jakob Wagner's hanging wine rack evokes surprise and admiration for the boldness of the designer

Kitchen design for a connoisseur of good wine from Ernestomeda will keep the entire collection in sight

The calm design of the Potterybarn wine rack will not break the harmony of any style

The design accessories for storing wine bottles are so diverse that anyone can choose a wine rack to their liking.

Umbra's creative wine rack resembles a curiously folded ribbon

Wall-mounted wine rack TRELLIS Rack System from Modern Cellar attracts attention with nobility and clarity of lines

The FLOAT Wall Shelf Mini by Modern Cellar reliably protects fragile bottles

Wine cabinet from Potterybarn has an impressive and respectable appearance

The Potterybarn wine rack is decorative and functional

Wine cabinet from Potterybarn has a light, elegant design and is suitable for classic interiors and interiors in the Provence style

The Potterybarn wine cabinet gives the impression of solid nobility

A wine rack from 2B.group fits best into a loft-style kitchen interior

The original wine rack for the music lover has an unusual design that guests will appreciate
The bottle holder will be a great accessory in your interior. After all, this is a useful thing for the house, which will serve as the storage of wine bottles.
All guests and friends will be happy, coming to your house, to observe neatly stacked bottles that are easy to get and offer you.
Making such a stand with your own hands is quite simple. In addition, it can be used not only in the apartment, but also for.
Manufacturing materials vary. Use the available tools, such as cans, cardboard, wood, cloth, and so on.
We will show you several options on how to make a do-it-yourself wine bottle holder and we hope that you choose the one that suits you.
Bottle holder made of newspaper tubes

In every home you can find many newspapers and unnecessary magazines. We will use them in our master class.
For a do-it-yourself wine stand from newspaper tubes, we need:
- newspapers or magazines;
- stick for mini-kebabs;
- ruler;
- stationery knife;
- pencil;
- cardboard;
- brushes;
- scissors;
- clothespins;
- paints and varnish.
We take a newspaper page and unfold it, cutting it into four parts. Next, we take a barbecue stick and start winding strips of newspapers on it.

You should have straws with an uneven, beveled end. We put the twisted tubes for the future bottle holder side by side.
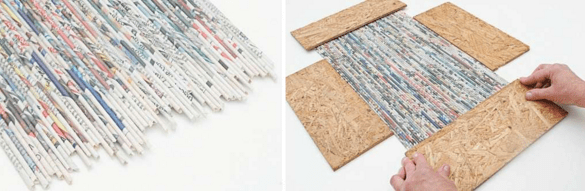
To do this, it is better to make a square outline of the books so that they do not roll and fit tightly to each other.
Each housewife buys canned corn, peas and other products. Jars should not be thrown away. You can make a pretty nice bottle holder out of them.
Moreover, even a woman can easily cope with this.
We need the following materials for a stand for wine bottles:
- 6-12 tin cans;
- can-opener;
- aerosol can;
- glue;
- cloth or cardboard;
- gloves.
The number of jars can be different, it all depends on how many tiers you want to make in the stand.
How to make a stand for bottles from tin cans with your own hands
Wet the jars to remove all labels. After that, wipe them well or leave to dry for a while.
Using a can opener, cut out the bottom and bottom of each jar. To prevent the remaining sharp edges from hurting you, you need to pinch them in the opposite direction or carefully remove them altogether.

For a beautiful do-it-yourself wine bottle stand decor, take a can and spray the paint first on one inside of the can, then turn it over and apply the paint on the other side.
Do not forget that the tin can has ribbed edges, so apply the paint carefully, while rotating the future stand.

After the paint has dried, you can proceed to the outside. Color it in the same way.
An amazing idea would be on a do-it-yourself wine stand. It's pretty simple and unusual.
Now we need to assemble our wine bottle holder. To do this, fasten each jar with a clip or clothespins and apply super glue between them.

You can give various forms, guided by your imagination. A stand for wine bottles from cans must be able to withstand the planned liters, so a good glue should be chosen.
DIY cardboard bottle holder

This stand looks no worse than a store-bought stand. Only you can save money and make it from the materials available.
You will need:
- 2 paper towel rolls;
- scissors;
- ruler;
- glue gun;
- sanitary tape of any color;
- felt;
- spray glue.
You need to take the sleeve and cut it in half, defining the center with a ruler.

It is better to cut it with a clerical knife or a knife on wood, lightly pressing on it, but not overdoing it, so as not to bend the future bottle shelf.
Do the same with the second sleeve. This gives you 4 wine slots.

Use a hot glue gun to staple all parts of the stand together. If you do not have much space in the apartment, then you can use two or three cells or add more.

Take a sanitary tape and stick it around the edge of each cell, but leave the inner ones intact.

Use felt to make the stand more colorful. Cut a piece that will fit snugly against the surface of all the cells.
Apply glue to the wrong side of the fabric and attach it to the bottle holder with your own hands, pressing well.

Remove excess felt with a knife after it has dried. For ideality, you can paste over the entire bottom surface with colored tape.
Whatever bottle holder you choose, it will definitely decorate your interior and will be very useful for any occasion!
For true connoisseurs, no meal goes by without a glass of wine. This magical drink has long gained widespread popularity and still has no plans to give up its positions. But what to do when a large number of bottles of wine have accumulated at home, which have long been nowhere to put? There is an exit!
An original hand-made wine shelf will not only give the interior an extra zest, but also make your life much easier, freeing up a lot of space.
A wine rack is a functional element of your home, which can also be decorative.
It only takes a few elements: imagination, tools, a little free time, and a little money.
The next couple of ideas for homemade shelves will help you decide on the choice of design for your, author's, original and unique shelf.
The simplest option of all is a plastic tube wine rack.
For this you will need:
- PVC pipes (with a diameter slightly larger than the diameter of the bottle);
- old bedside table.

We start by refining the old curbstone. In order for it to look attractive, you need to process the sections of the bedside table with sandpaper and cover with the color you like or just varnish.

Then we cut the pipes to a suitable size. We process the resulting "nests" for wine with acetone and paint also in the color you like, but with the help of paint sprayed from an aerosol can.

You can fasten the pipes using any available means: rope, tape, chain, glue and much more.
Another way to create the simplest shelf is to use a two crossed slabs wine shelf.
For this you will need:
- Two identical wooden planks.
The letter "X"
To do this, you need to saw through each of the planks to the middle so that the width of the cut is equal to the width of the board.

Snake
This type of arrangement is suitable for rectangular structures. In this case, the boards are fastened together with glue, using clamps.
This option of shelves is suitable both for placing them independently, for example, on the wall, as separate furniture, as well as for placing them in existing furniture: you can create a whole mini-bar from a kitchen sideboard. To do this, however, you will have to sacrifice the space inside the finished cabinets, sideboards and other furniture modules.

Another simple option for a wood wine shelf is a round plywood shelf
For this you will need:
- Two sheets of thick plywood.
We take two sheets of plywood and make round holes in them in the same places. The diameter of these holes should be slightly larger than the diameter of the bottle itself - 10-12 cm. Then we fasten two plywood at a distance of 15-20 cm from each other.
The holes can be scattered over the entire area in chaos, or they can be arranged in any particular order. Here it is already at your discretion. Also, if you wish, you can paint the shelf or add some accessories: additional carved elements, artificial fruits, etc.

For this you will need:
- Newspapers;
- Ruler;
- Paints;
- Cardboard;
- skewers for mini barbecue;
- PVA glue.
First, we need to make newspaper tubes. We take kebab skewers and wrap pieces of newspaper pages on them. We make the edges of the stick with a bevel.
Next, we lay out the made newspaper tubes in a row so that they are in contact with each other as closely as possible. We evenly apply PVA glue on them and fix the tubes as accurately and with high quality as possible. We are waiting for the product to dry.
The next step is to cut out polygons of 30mm * 30mm * 33mm * 16mm. We glue the edges together and secure with a folding clip.
When the polygons are dry, you need to cut out a circle, the size of which should correspond to the size of the bottom of the stand.
We fix the bottom and, at the end of the work, cover the stand with wood varnish. We apply it in at least two layers. If you want to brighten up the wine bottle holder, you can paint it with acrylic paint.

This will require:
- glue;
- spray paint;
- fabric (so as not to smear everything around with paint);
- canned food knife;
- cardboard;
- tin cans of 8-12 pieces (absolutely any cans are suitable: from under peas, corn, beans, etc.).
First of all, we clean the jars of labels: we soak them in warm water, as this will help to remove the paper from the surface quickly and will not allow leaving small scraps. Next, dry clean jars.
Then you need to cut out the bottom of the can, and process the sharp edges and bend them inside the can.
We put the jar on a stand and apply paint first to the inner and outer sides. When the jar is dry, proceed to applying paint to the outer edges and leave it to dry again.

The number of jars used depends on how many tiers in the stand you have planned to make.
After all the cans are dry, we begin to assemble the structure. We make the first row and fasten the cans together with superglue. We fix this row with clothespins, glue the subsequent rows and let it dry.
For this you will need:
- Polished birch plywood sheet (1.5m * 1.5m);
- Propylene black rope;
- Dowels (thickness −4mm);
- Sanding paper (120cm and 220cm);
- Acrylic impregnation for wood;
- Brush;
- Old laminate (for a template).
We cut the plywood lengthwise so that you get 5 vertical elements. Then, from a piece of old laminate, cut a round hole with a diameter of 10-12 cm, which we will use in the future as a template.
Use this template to measure and draw circles on vertical sheets of plywood. Next, we make a hole inside each such circle so that we can freely insert a jigsaw saw into it and then cut out holes for bottles with it. But it is worth making these holes a little bit smaller than you originally drew.

The next step is to cut out the top and bottom cover of the shelf-rack and, again, using a cutter, we make grooves so that their thickness is the same as the thickness of the plywood. This is necessary so that the vertical sheets fit into the grooves as tightly as possible.
After that, we round off by 6mm on all holes and edges of the parts using a router. At this stage, your wine rack already begins to look like an almost finished product.
At this point in the process, you can give your fantasy a reason to roam. So what can you do to keep the bottles from falling out? Alternatively - a rope mesh on the holes in the extreme vertical wall.
We mark the holes, then drill the holes, where we subsequently insert the rope and process them with a grinding attachment so that the rope does not cling to and break off pieces of plywood sheet. We grind your almost finished product with a grinder.
Now you can paint the wine rack in the color you like along the grain with a regular brush.
At the end of the process, we drill holes for dowels in the upper and lower covers, glue them in and in this way connect all the vertical and horizontal parts of the shelf-rack.
Let the glue dry. This will take at least a day. Then we lace up the holes in the back wall with rope, tape or whatever you like best. Your wine rack is ready! You can arrange the wine.
For this you will need:
- Metal copper pipes;
- Pieces of leather.
It is worth considering that for this product it is necessary to specially order a pipe of the shape you need. We process and hem the pieces of leather and then fix them on the finished pipe.
Instead of metal pipes, you can use wood material. Most people associate good wine with aging: old wine is good wine and therefore highly prized.

You can use such a life hack in the design that will give the shelf an old look. That is, your shelf can be artificially aged. To do this, cover the product with a stain, let it dry, and then go over it with zero-grade sandpaper. As a result, you will get scuffs that will give the shelf an old look.
As for the choice of a product for an independent construction, then there are a great many options: you can dwell both on a familiar and fairly simple design, and on an original, intricate and complex. It all depends on your preferences, desires and home design.
Most people drink wine right after purchase, but there are those who manage to create in their kitchen a kind of wine cellar with valuable specimens. This design will be appropriate not only in a private house, but also in a city apartment. In order to give the kitchen a special chic and store the wine according to all the rules, it is necessary to purchase bottle coasters. If you want exactly something unusual, then you can create unique holders yourself.
Wine storage options
For wine to bring true pleasure, it must be properly stored. It is worth remembering that the best option to preserve the noble taste of the drink is to store the bottle in a horizontal position. No matter how beautiful the currently offered wine stands, if they are made in such a way that the bottle stands vertically or at an angle, this option will not work for long-term storage. They are ideal for serving wine effectively on the table.

But the rule of horizontal storage should not be taken into account if the bottles with wine are not planned to be stored in the stand for more than 5 years. Those wines that were purchased on the occasion of the celebration do not need such precautions. To clearly determine the desired location for wine bottles in the kitchen, it is worth considering the most popular types of storage systems.
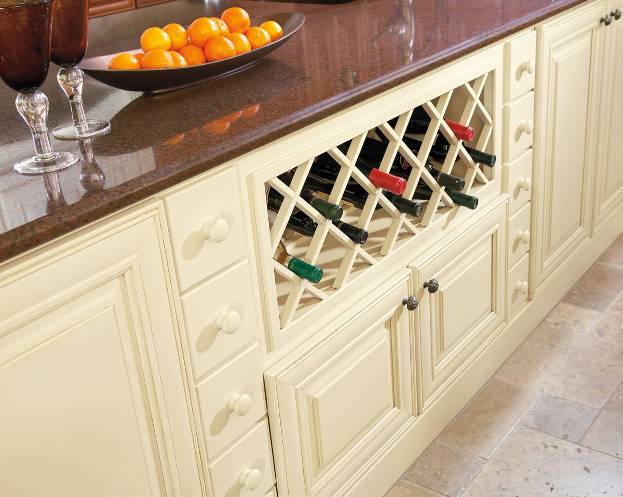
Integrated honeycomb storage
If the kitchen is not large in size, and there is no space to accommodate a full-fledged storage cabinet, then the so-called wine cells can be arranged at the top of the kitchen unit. This will keep the bottles safe without the risk of breaking, and the usable space will be used. This design solution is perfect for kitchens with high ceilings.
Advice! Alternatively, the honeycomb for wine bottles can be installed directly into furniture or into a niche in the wall.
Wine rack
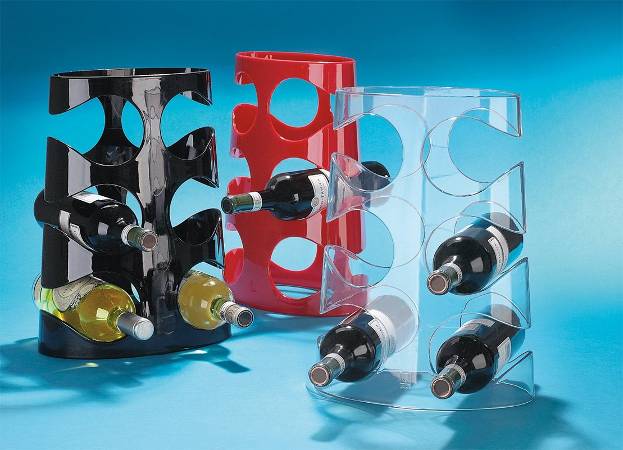
Racks for storing wine bottles are no less popular. Now the market offers a sufficient number of options for such holders in different sizes.

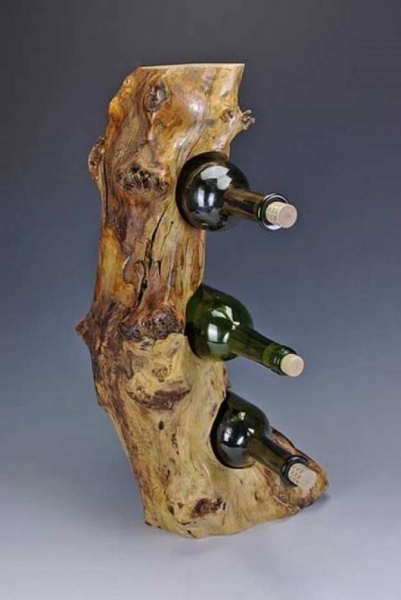
With a little effort, you can decorate the kitchen with your own hand-made wood for bottles. This will require a not too thick tree trunk, which is pre-cleaned of dirt and dried. You can remove the bark at will. It is important to fix it as efficiently as possible near the floor and ceiling, so that the finished stand structure is stable. In order to organize the storage space, holes of a suitable diameter are drilled in the barrel. Wine bottles are inserted into them.
Wooden coasters
In most styles, wood takes a dominant role, pushing back metal and glass, so it is worth considering wine coasters made from this material. They will become an original addition to country style kitchens, Provence and even minimalism.
For a small kitchen, it is better to choose concise models of coasters, without excessive decor. Hanging shelves made of wood look interesting. For the Provence style, they are artificially aged. The wooden shelf-stand will take up a little space, but will become a highlight of any interior. With the right choice of accessories, the room will sparkle with new colors.
Important! A simple wine shelf will make the kitchen elegant and add aristocracy to the overall style.
Designer wine stands
Whatever one may say, but designers constantly come up with new solutions for various, sometimes the most ordinary things, making them unique in their kind and highly functional. The same goes for wine coasters. Let's take a look at the most famous variants of wine holders, which were created by the leading designers of our time:
Vineyard Wine Rack By Pack & Rack... This shelf is a great minimalistic solution for storing wine. In addition to the bottle, you can also place glasses on it. Great wine doesn't need to be hidden, it should decorate the kitchen design, which can be done with such a wine bottle holder.

The stand length is 920mm, which is 1 yard. This was the starting point for creating a name for the model. Thanks to the ability to hang the stand in different ways, including even diagonally, it will be a stylish piece of furniture.
Bali Wine Rack. Such a design of this stand will perfectly fit into any kitchen. Even without filling, such a rack will look like a separate art object.

Wine bottle rack from Exclusive Wooden Products. A unique design cylindrical stand with a recess for 1 bottle of wine. Can be made from ash, alder or oak.
Important! Such a stand does not require attachment to the surface, as it is stable due to the fact that the bottle inserted inside organizes a counterweight.
For best stability, the depth of the base in the hole is individually adjustable. The wine holder is sold in a branded bag made of natural fabric. What is remarkable, both on the stand itself and on the bag, you can engrave and apply a drawing or inscription as you wish.
Hanging wine rack Cioso Blomus. This stand will be a unique solution for a loft-style kitchen. It is designed for 8 standard bottles, which will be quite enough. If desired and necessary, you can purchase two of these holders at once in order to store a larger number of bottles of wine.

Original UMBRA wine holders. It is a creation in an original form from circles of different diameters, thanks to which any bottle of wine can be placed in each hole in the stand. A fantasy flower made of transparent acrylic - the creation of the hands of designer David Kuan - can be attributed to the same series.
Hanging Wave Shelf from Design My World. According to the designer, he was inspired to create such a bottle holder by watching the stream of wine pouring into the glass. For decorative purposes, bottles with red wine can be placed on one side, and bottles with white wine on the other. And also the checkerboard arrangement of the bottles on the stand looks beautiful.

At the moment, you can find amazing options for wine coasters that will make the kitchen space lively and interesting. Some models are aimed at creating a cozy atmosphere, while others, on the contrary, are unique components that captivate with the audacity of design and push the interior to a new level.
Do it yourself
To decorate your kitchen, you don't have to spend money on buying a new wine stand. This is an item that you can make yourself if you want. The main thing is a little time, concentration and the implementation of all steps gradually. Only in complex work can you get a great result. We will consider interesting options for wine coasters that are easy to do with your own hands.

The simplest model of a corner holder
This stand is similar to the one presented earlier among the design ideas. It captivates with its simplicity and practicality. To create it, it is enough to choose a suitable wooden blank and cut out a corner-shaped figure from it according to the dimensions shown in the drawing below.
Important! A pen drill is used as a tool to create a hole with a diameter of 35 mm.
When cutting out a piece, it is important to leave a small allowance for the necessary grinding. The workpiece of the stand is sanded, its upper corner is rounded off. If desired, the finished product can be coated with wax, stain, varnish or oil.
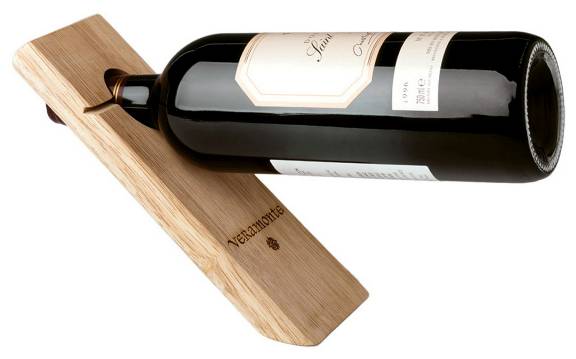
Balancing stand
This interesting holder allows you to achieve the effect of the bottle floating in the air due to its horizontal position. Due to the simplicity of the design, it is easier to perform than the previous version of the stand.
For manufacturing, you will need a sanded piece of board with a thickness of 2 cm. The product must be cut out according to the dimensions given in the drawing and processed with sandpaper. Again, a top coat of varnish or paint is applied to the stand if desired.
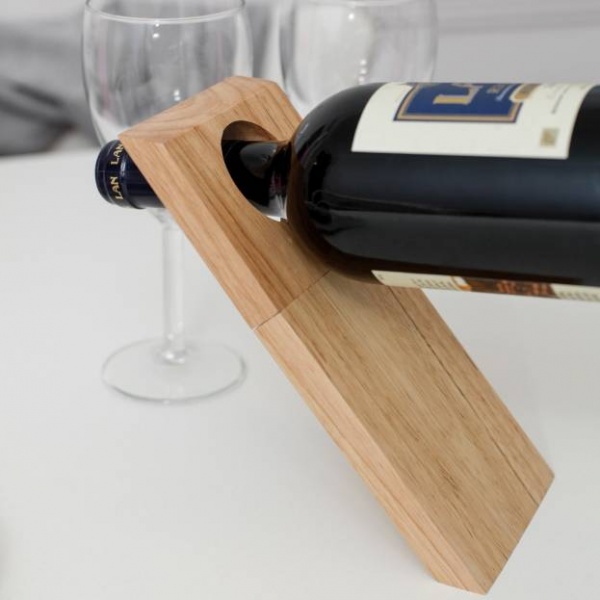
Balancing stand - crescent
Thanks to its unique geometric shape, this wine stand is able to hold the bottle with high quality, without the risk of the latter falling. For the manufacture of such a holder, a workpiece with dimensions of 260x140x48 mm is required. It is cut out using a jigsaw or a band saw strictly to size, leaving an allowance for grinding. A hole with a diameter of 35 mm is drilled with a feather drill. Finishing includes sandpapering, varnishing and, if desired, any kind of engraving or drawing with paint.
Oriental wine rack
This seemingly complex piece of kitchen interior can be done independently, if you adhere to the drawing and have a little experience in creating spike products. Installation of the bottle holder is carried out from standard elements, which makes it easier and faster to assemble the structure.
Advice! For the showiness of the product, you can use dark and light wood.

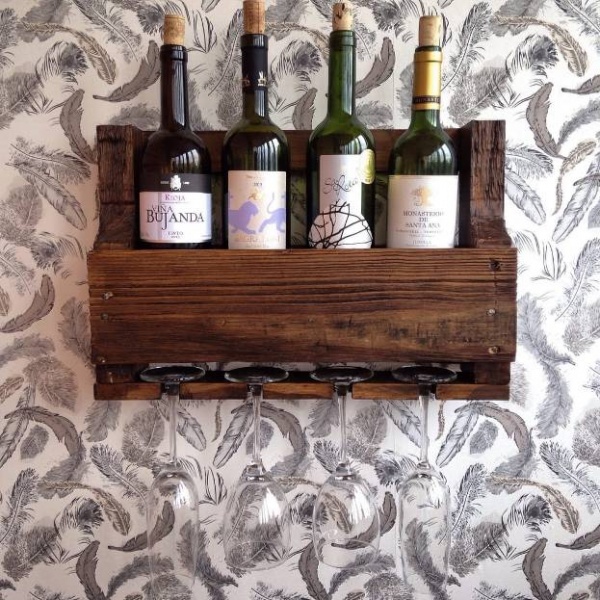
Wall mounted wooden holder
Such a wall-mounted stand can accommodate a large number of bottles of wine, which is very convenient when wine in the house is not only a drink for big celebrations, but is also used at dinner.

Elegant hinged stand
It will require two plywood sheets measuring 26 * 38 cm, loops, cord. And also be sure to prepare a ruler, a drill for holes, a pencil, sandpaper with a grain size of 150. On the plywood sheets it is necessary to mark the places for holes for bottles in the amount of 12 pieces, cut them out. The edges of each resulting hole must be carefully sanded

After that, you need to mount the hinges. It is better to take decorative items, rather than massive ones, so that the stand is elegant. The holder is equipped with two hinges for maximum stability. The last step is to attach the prepared cord to secure the stand in the intended position. To do this, in each bottom corner of the plywood sheets, a hole is drilled into which the rope is threaded so that the free edge can be tied.
Metal stand
From the remaining parts of metal pipes and pieces of leather, you can make a unique stand that will delight you with its appearance and practicality. In the absence of metal components, they can be replaced with wooden ones.

The stand can be of such a form, which the master will only regret. The connection of parts can be carried out with metal adapters or self-tapping screws if wood is used. The leather inserts themselves are fastened with decorative threads or staples.
Hook holder
From an ordinary board and several hooks, you can make not only a clothes hanger, but also a stand for wine bottles that is unique in appearance. The main thing in this idea is to creatively design the base board and pick up interesting hooks.
Advice! Long nails can be used instead of hooks.

Wrought iron stands
If the master has experience in forging, or the product is ordered by a specialist in this matter, then an amazing thing will turn out that will take an honorable place in the house. Moreover, such a model of a wine stand is suitable for both the kitchen and the living room.
There are a huge number of design options for such a holder, and they are not limited to some kind of framework. At the hand of a blacksmith, a piece of metal can be transformed into a stylish bottle holder with sharp peaks, a vine with a place for a bottle, a fantasy flower or any other image the customer desires. Interestingly, such a wine stand can even be painted in order to harmoniously fit into the interior of the kitchen.
The bottle holder will be a great accessory in your interior. After all, this is a useful thing for the house, which will serve as the storage of wine bottles.
All guests and friends will be happy, coming to your house, to observe neatly stacked bottles that are easy to get and offer you.
Making such a stand with your own hands is quite simple. In addition, it can be used not only in the apartment, but also for.
Manufacturing materials vary. Use the available tools, such as cans, cardboard, wood, cloth, and so on.
We will show you several options on how to make a do-it-yourself wine bottle holder and we hope that you choose the one that suits you.
Bottle holder made of newspaper tubes

In every home you can find many newspapers and unnecessary magazines. We will use them in our master class.
For a do-it-yourself wine stand from newspaper tubes, we need:
- newspapers or magazines;
- stick for mini-kebabs;
- ruler;
- stationery knife;
- pencil;
- cardboard;
- brushes;
- scissors;
- clothespins;
- paints and varnish.
We take a newspaper page and unfold it, cutting it into four parts. Next, we take a barbecue stick and start winding strips of newspapers on it.

You should have straws with an uneven, beveled end. We put the twisted tubes for the future bottle holder side by side.

To do this, it is better to make a square outline of the books so that they do not roll and fit tightly to each other.
Each housewife buys canned corn, peas and other products. Jars should not be thrown away. You can make a pretty nice bottle holder out of them.
Moreover, even a woman can easily cope with this.
We need the following materials for a stand for wine bottles:
- 6-12 tin cans;
- can-opener;
- aerosol can;
- glue;
- cloth or cardboard;
- gloves.
The number of jars can be different, it all depends on how many tiers you want to make in the stand.
How to make a stand for bottles from tin cans with your own hands
Wet the jars to remove all labels. After that, wipe them well or leave to dry for a while.
Using a can opener, cut out the bottom and bottom of each jar. To prevent the remaining sharp edges from hurting you, you need to pinch them in the opposite direction or carefully remove them altogether.

For a beautiful do-it-yourself wine bottle stand decor, take a can and spray the paint first on one inside of the can, then turn it over and apply the paint on the other side.
Do not forget that the tin can has ribbed edges, so apply the paint carefully, while rotating the future stand.

After the paint has dried, you can proceed to the outside. Color it in the same way.
An amazing idea would be on a do-it-yourself wine stand. It's pretty simple and unusual.
Now we need to assemble our wine bottle holder. To do this, fasten each jar with a clip or clothespins and apply super glue between them.

You can give various forms, guided by your imagination. A stand for wine bottles from cans must be able to withstand the planned liters, so a good glue should be chosen.
DIY cardboard bottle holder

This stand looks no worse than a store-bought stand. Only you can save money and make it from the materials available.
You will need:
- 2 paper towel rolls;
- scissors;
- ruler;
- glue gun;
- sanitary tape of any color;
- felt;
- spray glue.
You need to take the sleeve and cut it in half, defining the center with a ruler.

It is better to cut it with a clerical knife or a knife on wood, lightly pressing on it, but not overdoing it, so as not to bend the future bottle shelf.
Do the same with the second sleeve. This gives you 4 wine slots.

Use a hot glue gun to staple all parts of the stand together. If you do not have much space in the apartment, then you can use two or three cells or add more.

Take a sanitary tape and stick it around the edge of each cell, but leave the inner ones intact.

Use felt to make the stand more colorful. Cut a piece that will fit snugly against the surface of all the cells.
Apply glue to the wrong side of the fabric and attach it to the bottle holder with your own hands, pressing well.

Remove excess felt with a knife after it has dried. For ideality, you can paste over the entire bottom surface with colored tape.
Whatever bottle holder you choose, it will definitely decorate your interior and will be very useful for any occasion!