Star News


Figured cutting of vegetables and fruits with a photo for beginners. Fruit and vegetable carving for beginners: everything about this amazing kind of creativity Carving on vegetables and fruits
Those who want to learn the art of creating paintings from vegetables and fruits can be recommended to attend a carving master class. Carving is an artistic cutting of vegetables and fruits. Carving from vegetables and fruits is a great opportunity to come up with a composition in an original technique, decorating a festive table for a family celebration. Carving is a technique for some so new that the name is sometimes confused - they are looking for carling on the Internet or something else that sounds similar. But what if you liked the technique you saw somewhere, and you want to try to create a small masterpiece from watermelon or carrots in your own kitchen? Of course, do not be afraid, and - start learning step by step. To help you - a detailed guide, training video, and pictures in examples of finished works.
Carving lessons for beginners are a great opportunity to get step-by-step instructions on how to create vegetable and fruit compositions with your own hands using the curly cutting technique. Novice craftsmen are advised to attend a master class or watch a training video, and only then proceed to making cutting masterpieces with their own hands.
For, to master the art of carving vegetables, you will need the following tools:
- special knife with a narrow and short sharp blade;
- a knife with a wide blade for making large elements of the composition;
- knife with a long narrow blade;
- small scissors for processing the edges of vegetables;
- thin wooden sticks (such as toothpicks) for holding vegetables.
List of the most common vegetables, from which you can create an original work with your own hands:
- pepper (hot or sweet);
- radish;
- cucumbers;
- cabbage;
- pumpkin;
- potato;
- tomato.
After attending a vegetable carving master class, some craftsmen will learn how to create original still lifes with their own hands, using the natural properties of different vegetables: color, texture, hardness. The main thing is creativity, patience and accuracy.
Gallery: carving from vegetables and fruits (25 photos)


Fruit carving for beginners
For fruit carving you will need about the same tools as for curly carving from vegetables. But at the same time, it must be borne in mind that fruits have a softer and friable texture, therefore, when working with them, in no case should you press hard on the knife. If a novice master will remember this, he will be able to create a real masterpiece with his own hands. Fruit carving will look especially beautiful at a children's party.
At a fruit carving master class, beginners are usually offered to make a picture with their own hands from:
- apples of different varieties;
- citrus fruits (oranges and lemons, less often tangerines);
- watermelons;
- melons (choose those varieties that have a fairly firm pulp).
The simplest version of fruit carving- making a curly basket of watermelon or orange with your own hands. A beginner master can easily do this job by watching the tutorial video. The finished basket can be filled with other fruits or berries, it will serve as a wonderful gift or decoration for a festive table. And the children will be simply delighted. The main thing is to skillfully play with the natural properties of fruits: color, texture and shape.
Figured carving from vegetables and fruits is a creative activity. You can come up with ideas for creating compositions yourself, as well as borrow from experienced specialists by watching a video or attending a master class.
However, regardless of the creative intention, when creating vegetable and fruit paintings with your own hands, you must keep in mind the following:

Other uses for carving
 Carving opens up to novice craftsmen wide scope for creativity... You can create beautiful compositions with your own hands not only from vegetables and fruits, but also from cheese. And there are craftsmen who are engaged in artistic soap carving. The master class and training video can be easily found on the Internet.
In the quilling technique, ordinary objects are depicted. The network contains many photos and videos about this needlework. such a plan. Crafts of fruits and vegetables are popular with beginners. This is a universal option for those who want to do unusual things with their own hands.

Simple objects with the quilling technique look attractive.

A standard curl of paper strips was used for almost all items. Anyone can do such a quilling job, even a child.
Fruit is often shown in a section. This allows you to preserve the naturalness of the craft, and gives it the necessary naturalness. Following the tutorial, you will make your own variation on the fruit theme.
Make cut oranges, kiwis and strawberries. This color combination, vaguely reminiscent of a traffic light, will be bright and pleasing to the eye.

For work you will need:
- stripes of paper are red, orange, white, brown and green;
- PVA glue;
- twisting tool;
- stencil;
- scissors.
For orange slices, use the standard drop shape. After making the required number of elements, wrap white stripes around them. Glue the parts together in a circle. Don't forget to peel with an orange piece of paper.
To get kiwi, also use the drop shape. For the core, a white stripe twisted into an oval is suitable. Additionally, use miniature black rolls to simulate seeds. After gluing all the details, wrap the circle with a brown strip. This will be the kiwi peel.
To make strawberries, roll small, tight rolls. Glue them in the shape of a strawberry, and wrap the finished berry in a strip of the same color. Cut out a tail out of green paper. Such a fruit salad you will get.
A bowl of fruit
To make the fruit composition meaningful, you need to make a beautiful quilling vase. To create a simple vase, the technique that you familiarized with at the beginning of the lesson is used, that is, rolls and drop-shaped parts are performed.  Make the required number of elements, from which the bottom will then turn out. Use medium-sized, tight rolls. After gluing them tightly to each other in the shape of a circle, dry the workpiece. The diameter of the bottom of the vase should be from 10 to 15 cm.
The glue has dried, and you need to start making the sides. Glue the parts and dry the layers in stages. Alternate simple rolls with teardrop-shaped elements to create a beautiful ornament.  The vase looks in any interior, complements and decorates it.
Fruit basket
A quilling basket is suitable for fruit. It is done simply, but it looks original.
Necessary materials:
- quilling strips;
- awl or special tool;
- scissors;
- glue.
Sequence of work:
Start by creating the details of the basket. These are tight and loosely twisted rolls. Make the required number of parts and start assembling.  To make the bottom of the basket, alternate dense parts with loose ones, layer by layer. Continue working on the side areas of the basket. Let the workpiece dry, then make a handle from tight rolls.
Quilling fruit magnets
Quilling paper magnets are very popular. Following your chosen theme, make them in the shape of fruits, such as apples.
Prepare materials and tools:
- quilling paper in green, yellow, red (depending on the selected apple variety);
- an awl or quilling tool;
- glue;
- scissors;
- cardboard;
- magnet to which the craft is glued.
Step-by-step instruction:
Cut apples to the size you want from cardboard. Make them medium so that the magnet can support the weight of the craft. Match colors and shapes to suit your interior.
Twist the elements in the form of a drop for quilling fruits For a large apple, large blanks are required. Sometimes needlewomen use round elements, but the drops look more elegant.
 Make the required number of blanks, then make the same green details for the leaves.
Take a cardboard form, glue the apple and leaf elements to it. Make a sprig of green or brown rolls.  Let the finished craft dry. After that, apply a special gel or glitter on it. The final step will be to attach the magnet to the product. Use hot glue for this purpose.
Video tutorials: Making fruits and vegetables using a quilling technique
Fruit sketches for quilling


Carving (carving) - "cutting patterns". Downhill skiing with a series of cut turns, long-term styling of curls and curls, patterned carving on wood, stone, soap, ice, vegetables - all this is included in the concept of "carving".
We present the most beautiful works of artistic carving on vegetables and fruits.
(12 photos of fruit carving)
The edible direction of carving (culinary carving) - carving marvelous patterned figures from vegetables and fruits - is used today by many chefs to decorate festive tables. 
The intricacy of the figurines cut from a variety of foods brings culinary carving closer to a primitive art form. But such art is very short-lived, because the material here is a living and delicate material - vegetables and fruits. 
The history of carving.
This peculiar art arose in medieval half-starved, populous Southeast Asia, and not in more prosperous Europe. 
The Europeans had a fairly varied and high-calorie foods. The diet of the inhabitants of Europe included meat of domestic animals, fish, poultry, fruits, cereals, game, vegetables ... The prepared dishes had to be first of all hearty and tasty. Even the tables of the European nobility were not particularly decorated. 
But in ancient Asia, there was no such variety of products. Often, Asians had to be content with a predominantly plant-based diet. An ordinary meal often turned into a whole ritual, and special attention was paid to the design of any product, which gave impetus to the development of the whole art of decorating dishes. 
One century followed another, and artistic fruit carving acquired its own special national features.
The Chinese-Japanese technique is characterized by images of dragons, inscriptions with congratulations, and historical scenes. Sino-Japanese carving is reduced to the extrusion of hieroglyphs or figures with a standard set of notches and stencils. 
Thai carving masters have finer carving techniques and a more complex set of tools. The festive table in Thailand is traditionally decorated with carved flowers, because the symbol of this state is the orchid. Narrow and thin "Thai knives" with a whole arsenal of cutters of different configurations are used to create amazingly elegant flower arrangements. 
It is clear that the Sino-Japanese technique is much easier to master. But the work of Thai craftsmen looks much more refined and beautiful. 
Carving today.
Interest in carving came to European countries along with a fashionable hobby for oriental cuisine. Restaurant chefs got carried away with curly cutting to give the table setting an unusual and attractive look. 
Exhibitions of food products and culinary shows have already become a long-term tradition to decorate with all kinds of fruit carved decorations. After all, there are no qualitatively new ideas and inventions like carving in modern cooking. 
Simple home carving with step by step photos.
CHRYSANTHEMA from Peking cabbage

1. From a head of Peking cabbage weighing from 300 to 700 g, remove loose leaves and cut off the top of the head, leaving about 12-15 cm.

2. We work with an oval or triangular cross-section carbide grooved knife.

3. Make slices of different lengths along the thick veins of the leaves, directing the knife from the upper cut of the leaf to the base of the cabbage. We make the beginning of the cut thinner. As we approach the stump, we deepen the knife into the cabbage.

4. Without cutting 1.5-2 cm to the stump, remove the large leaves cut out. If the sheet sticks tightly, make a few notches with a small knife.

5. Cut the subsequent rows of leaves in the same way, shortening the length of the chrysanthemum petals to the middle. If the edges of the petals are thin enough, then in cold water they curl up into rings or bend beautifully.

6. Put the "chrysanthemum" in ice water for half an hour. The product will take on a graceful shape. Cut out a couple of green "leaves" from a cucumber and make a composition on a platter with salad or various cuts.
Cucumber lily

1. Cut a 7-8 cm piece from the cucumber, cutting off the tail. Let's make a leaf-shaped cut without cutting to the bottom edge of the workpiece.

2. Make other leaves, with a small distance between them, bypassing the workpiece in a circle.

3. With a knife we make a cut in a circle with a thickness of 1-2 mm, creating a platform for cutting the next row. petals.

4. With an oval knife, make the next row of petals in a checkerboard pattern relative to the previous row. Trim the area again for the next level of petals. Make as many rows as the size of the workpiece will allow.

5. Using a noisette or a knife, scrape out the core of the cucumber, creating enough space to place the core in the center of the flower.

6. Cut the leaves with scissors, create a triangular shape at the ends. Immerse the flower in ice-cold water for a few minutes and it will open up beautifully.

7. From carrots, pumpkins or radishes, make a core of a suitable size. Let's decorate it with cuts.

8. Insert the core into the flower. Can be attached to a toothpick.
Put the lily on a twig with leaves or on a painted wooden barbecue stick. Leaves can also be cut from a cucumber.

CARROT LINE

1. Peel a dense carrot with a diameter of at least 3 cm, cut a straight piece of 8-12 cm in size. With a knife, make a square "tail" for the future cone. Next, let's give it an oval shape.

2. Having processed the workpiece with a knife in a circle, give the thick end of the cone a rounded shape and prepare a platform for cutting the first row of scales.

3. Divide the thick end of the workpiece visually into 6 parts, cut 6 petal scales in a circle. The depth of the cut is 2-3 mm.

4. With a knife we make a cut along a cone (deepening the end of the knife by 2-3 mm) under the scales, making out the volumetric pattern of the first row, thereby creating a platform for the next row of scales.

5. In a checkerboard pattern with respect to the previous row, cut out the next row. Cut the area again for the next row of scales. We make as many rows as the size of the workpiece will allow.

6. Immerse the cone in ice water for 10-15 minutes - it will open a little and harden.

KALLA from hot pepper
ADVICE. If pepper burns your hands after work, wash them thoroughly and wipe them with vegetable oil.

1. Take hot chili peppers, red or green.

2. Cut along the length from the stem to the tip.
3. Gently cut the pulp around the stalk. The seeds should remain on the stalk.

4. Expand the pepper, rinse in cold water and give the blank the shape of a calla flower.

5. Make a hole at the turn of the future flower and carefully insert the stalk with seeds into it.

6. Cut out the leaves from any green product (cucumber or others) and create a figured composition.


1. Give the carrots a cylinder shape. Pierce along the center line with a thin wooden skewer.

2. Soak the vegetable in a salt solution for 2 hours (1 tablespoon of salt per glass of water). The product must be soft enough and not break when cut thinly.

3. Visually divide the vegetable into four sides. We make the same cuts on the top and bottom sides, cutting through to the skewer. The distance between the cuts is 0.5 cm. We also make cuts on the two lateral sides - between the cuts on the upper and lower sides.

4. Carefully cut the fruit in a circle with a long thin tape up to the skewer. Cut off the skewer with the "stump" and straighten the net.

5. 6. We cut out several different colorful fish from a wide variety of products.


LILY from carrots

1. Give the vegetable the shape of a cone and a pentagon, cutting in a circle from five sides with a long knife. 
2. Cut a petal on each of the 5 cut sides.

3. Shape the petal with scissors.

4. Remove some of the pulp from under the petals of the first row (make the cone thinner). Cut out five more petals, staggering them relative to the petals of the first row. We do the third row in the same way.

5. With a knife we shorten the remaining core and cut it to a cone

6. Split the core into stamens with a knife.

DAHLIA

1. Let's make a slightly flattened round billet with a diameter of 5-6 cm from a homogeneous product.

2. With a medium oval knife, cut out 7-9 petals, deepening the knife towards the core.

3. Cut off excess pulp under the petals of the first row, forming a platform for the next row.

4. Cut the petals of the next row with knives of different sizes in the same way as in the first row. We place them between the petals of the previous row. We make as many rows as possible.

5. We cut to the end and make out the middle.

Chrysanthemum onion
for decorating salads, meat, fish and vegetable dishes

1. For the chrysanthemum, take a small round onion.
You can take both white and red onions. The smaller the bulb, the more beautiful the flower turns out.
Try to choose a thin-walled bulb, then the petals are thinner and open more beautifully.

2. Peel the onion and cut the top and bottom about 0.5 cm each.

3. Using a thin, sharp knife, carefully cut almost in half, not completely cutting about 0.5 cm.
The incision is made on the top side - where the feather grows.

4. Then cut it in half again in the same way.

5. Next, cut into as many pieces as possible. It is advisable to make as many incisions as possible.
If the cuts are not deep enough, the flower will not bloom well, and if too deep, the flower will fall apart.

6. Place the onion in water at room temperature - the water should completely cover the onion.
In an hour and a half, the chrysanthemum should "bloom". Chrysanthemum "blooming" time depends on the type of onion. Some varieties take 40 minutes, while others need a couple of hours.

7. To add brightness to the flower, dip the tips of the blossoming chrysanthemum in the beet juice (rub the raw beets and squeeze through the cloth). Dyeing time - until the desired color is obtained. You can also use any other food coloring - brightly colored juice (for example, cherry, blackcurrant), yellow saffron solution, Cahors or other red wine, pickled beet brine, etc.
You can dye the whole flower.

Orange colored "chrysanthemum" on the salad.

Onion flower

1. We peel the bulb without cutting off the root seal, but only well cleaning it from the roots.

2. Make 4-5 cuts (in this example, make 4 cuts) to a depth of 2-3 layers (in this example, 2 layers).

3. Bend the outermost layers (petals), and remove the inner cut layers with a knife. We do it all with caution, because the petals are very brittle.

4. Cut the layers of the bulb again, shifting the cuts in a checkerboard pattern relative to the first petals. Leave the first notched layer, and delete the inner layers again.

5. Repeat these steps until we reach the middle of the onion.


7. Then place in a vinegar marinade of water, vinegar and sugar (vinegar and sugar to taste) for 10 minutes or more to obtain the desired taste.
If you want to get a colored flower, you need to add food coloring to the marinade (see the previous recipe).

We take out the “flower” from the marinade, lightly shake off the liquid, beautifully straighten the petals and place on a dish.

Leek flower

1. Fold a wide leaf of leeks in half along and on the side of the fold to make frequent cuts, as shown in the photo.

2. Roll up into a roll - this will be the core of the flower.

3. Make petals from the wide parts of the onion.

4. Fasten the flower with toothpicks and place on a dish.

Leek bow

1. Peel young fresh leeks, cut off the white dense part of about 20 cm. At the same distance from each other, cut the onion lengthwise with several cuts to the full depth (to the center).

2. Fold back the "petals" of the first row and cut them approximately in the middle, giving them a triangular shape.

3. Fold the petals of the next row inward with a "bow".

4. Continue row by row to fold the petals. If the bow does not hold well, you can strengthen it with pieces of wooden toothpicks.

Festive "bouquet" of Chinese cabbage

1. Take a medium head of Chinese (Peking) cabbage.

2. Cut off the upper loose part.

3. Traditionally, vegetable carving (carving) is performed using special knives of various shapes. For example, such chrysanthemums are cut with a groove-shaped carbide knife. But you can adapt a simple improvised tool - a lid from an olive can, which must be bent in half to make an oval groove. The edges of the resulting groove are not too sharp, but you still need to be careful. It is necessary to adapt to keep it as comfortable as possible, without touching the edges.

4. Take the groove as shown and cut long grooves along the hard part of the head of cabbage. The groove should not go very deep at first. Closer to the base, you need to direct it deeper inward.

5. Before reaching about 2 cm to the end of the sheet, you must stop. Take out the groove and cut out the petal next to it. First, 3-5 petals are placed on one sheet.
Learn to make a bump from carrots, chrysanthemum from onions, flowers from radishes and apples. And carving for beginners will help this, which everyone can master.
The content of the article:
Carving in translation from English means "cutting". In cooking, it is the art of artistic cutting of fruits and vegetables. This interesting type of creativity originated in Southeast Asia. Japanese chefs lined the pottery in which the food was served with leaves. They understood that the beautiful arrangement of the leaves gives the dish additional attractiveness and began to artistically cut fruits and vegetables.
Later, carving penetrated Europe, but at first it was not very popular here. However, with the advent of restaurants, this art has become in high demand.

There are kits for artistic cutting for every budget and taste. But carving for beginners can be carried out without the use of special equipment for this type of creativity.
If desired, sets for cutting wood, for linocuts can be turned into tools for carving.
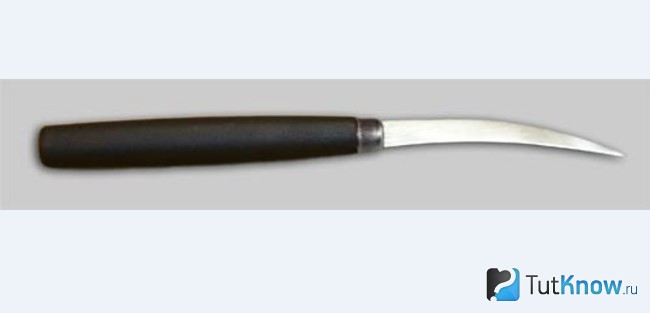
The most important knife used in this type of art is Thai. This is what he is.

Using such a tool, you can perform various elements of carving from vegetables and fruits. Therefore, if you have such a narrow knife with a thin blade, you can use only one at the initial stage. As you master this technique, you can purchase additional equipment to create more complex and interesting compositions. For these, the following types of knives are used:
- Thai - the group of these tools also includes sickle-shaped bent and wedge-shaped knives.
- Carb tools are V-shaped tools, as well as oval and round ones.
- Flute. Used to remove thin strips from fruits and vegetables. Flutes are called decorative grooves on such instruments.
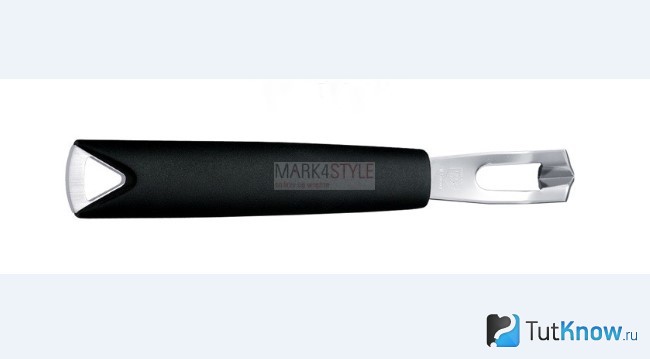
- Noisettes are notch knives that are used to carve shapes out of fruit. They have different shapes (diamond, round, clouds, etc.).
- Engraving and other knives for carving with replaceable blades are used if you need to remove the zest, remove the core; peel vegetables, etc.
- Culinary devices of the style of our domestic cookie molds.

Here is a sickle knife, which is used like the Thai one, but cut into larger parts with it.
With a flute knife, it is easy to groove vegetables and fruits. First, longitudinal stripes are made with this tool, and then, for example, a lemon is cut across into circles and shapes in the shape of a flower are obtained.
Carb knives for carving come in different diameters. They can be V-shaped and U-shaped. The first ones are easy to cut out the leaves, make engravings on the fruit bark.

U-shaped knives are used to create ornaments with rounded cuts.

Also, the carving tools include small scissors. With the help of them, flat straight, oblique or other cuts are made along the edge of the fruit.

Another interesting carving tool is the double-sided noisette spoon. It is used for removing pulp from large fruits, cutting out balls, hemispheres.
The noisette spoon is often used in French cuisine. Chefs use this tool to cut balls of raw potatoes and then deep-fry them.

If you have not yet acquired such tools, you can replace them by carving vegetables and fruits, with a scalpel, or a fruit knife.

Vegetable decoration - radish flower
The dish looks much more attractive if such an edible flower flaunts in its center or on the side. Even those who have never done this before will be able to cut it out of radishes. For this decoration, you can use ordinary small scissors and a sharp knife. Besides these, you will need radishes. The root crop should be even, rounded. In the photo it is red, but now those who grow this vegetable in their personal plots know that varieties of radishes of various colors have been bred. Therefore, the lily from this vegetable can be red, pink, yellow and even purple.

Cut off the top of the radish and mentally draw a 5-sided here. Now lead from this place down with a knife (but not all the way) so that the first petal is indicated. Thus, complete all five.
To make the next, inner row of petals clearly visible, cut the layer of pulp in a circle, which is located between the first and second row of petals.
Now take scissors and process all 5 petals of the outer row with them, sharpening the top of each, as shown in the photo.

Next, complete the second row of petals, which is staggered relative to the first. Then - the third and subsequent inner rows.
This is how you can make vegetable decorations for salad. Try not only carving a lily, but also a radish rose.

To make it look like this multi-petal, wash the root crop, cut off the green part from it. On the opposite side, make several parallel cuts in the center and then on the side of the root vegetable. Take another radish, chop it into thin slices. Insert them into the slots of the first root vegetable. You've got such an elegant flower. Find out what other salad dressings you can quickly cut out.
How to make a lily from an onion?

You will get such a wonderful chrysanthemum in just 5 minutes of work.
For this carving you will need:
- large onion;
- sharp knife;
- a bowl of water;
- beet juice.

Now make a cut perpendicular to this, and then a few more. The more there are, the fluffier the flower will turn out.

Pour room temperature water into a bowl, dip the workpiece into it, let the onion soak in the liquid for 40–120 minutes. During this time, the petals will "bloom", and you will get a beautiful flower using the carving technique.
The time for soaking the onions in water depends on the variety. Some will begin to "bloom" after 40 minutes, while for others, the waiting time for this process will be longer.
Now moisten the blank in beetroot juice, and you will have such a wonderful flower.

You can turn the chrysanthemum over, soak only the tips of its petals in the juice, or place the flower completely in the food coloring liquid.
How to cut a delicious carrot decoration?

Don't these buds look bright, realistic and festive? You can make them using carving knives, or by taking a regular kitchen knife with a narrow blade.
Take a root vegetable that is at least 3 centimeters in diameter. Cut upwards so that the length of the carrot is 8–12 cm. Remove the outermost pulp at the wide end of the root vegetable so that a square “tail” remains.

Now process the workpiece from the same side along the turn, rounding its shoulders on all sides. Then visually divide this top of the carrot into 6 parts, which will turn into the scales of a hand-made cone.

Deepening the tip of the knife by 2-3 mm, mark these scales. To prepare a pad for the second row of scales, cut out the carrot pulp in a circle just below the first. In the same way, but in a checkerboard pattern, complete the second row of scales. Under it, remove some carrot pulp along the cone again to make a third row of scales, which will be staggered in relation to the second.

In the same technique, you can make a few more buds to create a beautiful vegetable bouquet later.
To make the carrots harden and the scales open, place them in ice water for 15 minutes.

If you made this salad dressing, then place the buds in the center of the dish or place them along the edge of it. If you want to create such an amazing bouquet as in the photo, then string the processed carrots on a wire wrapped in a green floral ribbon. You stick the other end of the wire into the pumpkin, the pulp of which is also carved. It remains to cut the petals from the cucumber, decorate the composition with dill, after which you can put it in the most prominent place in the house or in the center of the festive table.

If you have carving knives, then use the V to make pointed scales. A U-shape will help create rounded ones.
Today you learned how vegetable carving is done. Follow the publications and soon you will learn how to artistically cut fruits that will turn into a firebird, a basket, and become colorful flowers.
In the meantime, check out the video, from which you will learn how to cut a rose from carrots, and see what you can turn ordinary vegetables into using carving: